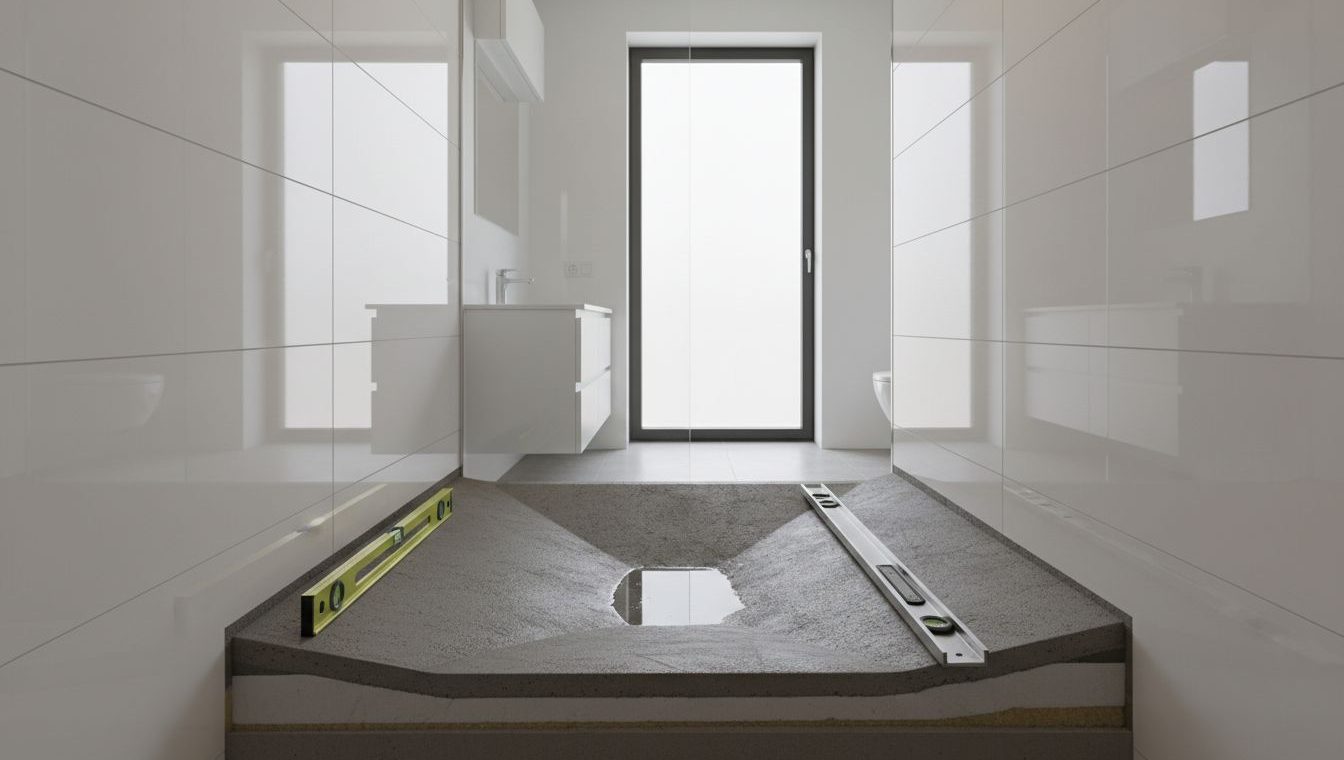
A shower can look perfect on day one and still fail in slow motion. The usual culprit is hidden underfoot: shower pan slope that looks fine at a glance but leaves small low spots where water sits. Tile goes down, grout gets damp, and that “small puddle” becomes a daily headache.
We prefer to catch those low spots (often called “birdbaths”) before thinset and tile lock everything in. With a basic level, a straightedge, and a few simple pitch tests, we can confirm drainage in minutes and avoid costly tear-outs later.
Birdbaths, the silent warning sign in shower pan slope
A “birdbath” is a shallow depression in the pan that traps water instead of feeding it to the drain. Think of it like a dinner plate with a tiny dent. Even if the plate is tilted, the dent still holds a puddle.
In showers, that puddle matters. Standing water increases the chance of soap scum buildup, dark grout, and slick spots underfoot. Over time, it can also stress the system around the drain and perimeter where moisture loves to linger.
Most shower floors are built to drain at about 1/4 inch per foot toward the drain (local codes and specs can vary, and the drain type and waterproofing method also affect details). If you want a plain-language explanation of common pitch targets, see this overview on proper shower drain slope per foot. We treat that number as a baseline, then verify the real-world surface because hands-on work can introduce small waves.
Birdbaths often come from a few predictable issues:
- A mortar bed that wasn’t packed consistently (soft spots settle).
- A drain that sits slightly proud or slightly low compared to the field.
- A perimeter screed that is level on two walls but drifts on the third.
- A “pretty” slope line that fails in the diagonals (the water still finds the low).
Before tile day, we want proof, not hope. That is where a level and a few repeatable checks earn their keep.
Simple pitch tests with a level (our pre-tile routine)
We don’t need fancy gear to catch most slope problems. We need consistency and a routine we repeat on every shower.
Tools we rely on
- A 24-inch level (long enough to reveal waves, short enough to fit most pans)
- A straightedge (a clean, rigid board or aluminum straightedge)
- A few spacers or shims (small wedges, tile spacers, or measured blocks)
- A pencil or marker (to circle low spots and draw slope arrows)
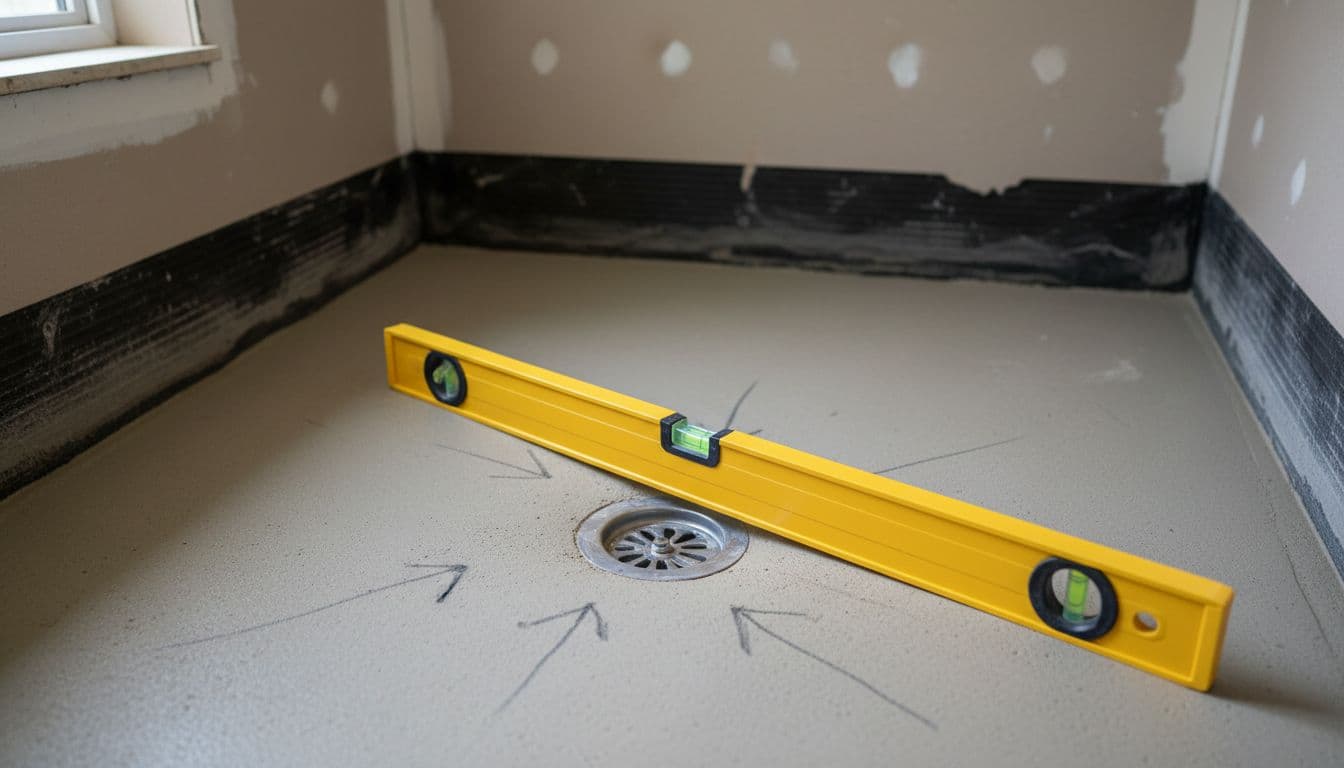
The checks that find birdbaths fast
1) Four-way drain-to-wall checks We set the level from the drain area out to each wall (north, south, east, west). We’re looking for steady fall with no “flat” surprise in the middle. If the bubble changes direction partway along the run, that often signals a dip.
2) Diagonal checks (where problems hide) Many pans look good on straight runs and fail on diagonals. We run the level corner-to-drain in both directions. If a birdbath exists, it often shows up here first.
3) Straightedge plus level (the “bridge” test) A straightedge bridges minor surface texture so the level reads the overall plane. We place the straightedge toward the drain and watch for rocking. Rocking usually means a hump. A stable straightedge with a “dead spot” in the middle suggests a depression.
4) Shim-confirmed pitch (simple and repeatable) This is the check that turns “it seems sloped” into a measurement. We place the level on a straightedge aimed at the drain, then use a known spacer under the high end to mimic the expected drop over that distance. If the bubble still wants to sit level (or worse, tips away from the drain), the field isn’t falling enough.
Here’s a quick reference we use to keep the process consistent:
| Check | What we place | What it catches | What “good” looks like |
|---|---|---|---|
| Drain-to-wall runs | Level only | Flats and reverse pitch | Continuous fall toward drain |
| Diagonals | Level only | Corner birdbaths | No mid-run “flat” zone |
| Bridge test | Straightedge + level | Humps and shallow bowls | No rocking, no obvious dip |
| Shim-confirmed pitch | Straightedge + level + spacer | Under-slope areas | Bubble response matches intended pitch |
Before tile arrives, we also like to confirm the jobsite is ready. This checklist on how to prepare your bathroom for shower tile installation matches what we recommend: clear access, protect adjacent floors, and plan for dust.
Fixing the pan before tile, and what we handle next
 When a test flags a birdbath, we mark the exact area, then decide if it’s a low spot we can fill or a high spot that needs correction. The goal is a surface that drains from every direction, not just the “main line” you notice while standing in the doorway.
Common pre-tile fixes include:
- Minor depressions: corrected with an approved patch or a skim coat that is compatible with the waterproofing method and thinset plan.
- High ridges: carefully reduced so the surface stops “bridging” over a dip nearby.
- Drain-area tuning: confirmed so the tile around the drain does not create a ring that traps water.
If the shower uses a liner and mortar method, proper layering and drain details matter just as much as the slope itself. This guide on correctly sloping a shower pan provides helpful context on how slope and pan construction work together.
We also follow installation standards because tile failures rarely come from one mistake. They usually come from a stack of small shortcuts. If you want to understand what “good” looks like beyond slope, see these quality tile installation requirements.
Many homeowners reach us for one project, then ask about the rest of the home. We handle showers as part of full interiors, and we often get calls from people searching for the tile installation company Alpharetta trusts for wet areas, a bathroom remodeling contractor in alpharetta and Milton, and the best flooring company alpharetta and milton for whole-home updates. In the same season, we may also help clients who want the top hardwood floor sanding contractor in alpharetta, a Stair company Alpharetta families can rely on, or a stair contractor alpharetta homeowners choose when treads and rails need a clean rebuild. When kitchens drive the scope, we coordinate with clients looking for the best local kitchen remodeling contractor in alpharetta and the best kitchen contractor alpharetta, then tie the flooring plan together so the finish lines up across rooms. Many still begin by comparing the best flooring contractor in alpharetta ga, then choose the team that explains the details clearly.
If you want to see how we approach bathroom tile work, visit our professional bathroom tiling services in Alpharetta. For walk-in shower planning, this step-by-step walk-in shower installation guide is a useful starting point.
For a fast, free estimate, call 470-352-1156. If you show us any existing quote from another contractor, we beat it by 5%.
Conclusion
Birdbaths are easy to miss and hard to tolerate once tile is down. A few careful shower pan slope checks with a level, especially diagonals and shim-confirmed pitch tests, can prevent daily puddles and long-term moisture issues. If you want us to verify slope before tile day, call 470-352-1156 for a free estimate, and bring any written quote so we can beat it by 5%.