A squeaky stair can feel like a tiny alarm that follows us through the house. One step is quiet, the next one chirps, and soon the whole staircase seems to “talk back” every time someone walks by. The good news is that most stair noise comes from a few predictable friction points, and we can often solve it with simple shims and the right dry lubricant.
In this guide, we’ll explain what causes the noise, what tools we actually need, and a clean, practical way to fix squeaky stairs without turning the project into a full remodel.
Why hardwood stairs squeak (and why shims work)
Hardwood stairs squeak for the same reason a violin makes sound: two parts rub and vibrate. In stair terms, that rubbing usually happens where the tread, riser, stringer, or subfloor meet.
Common causes we see:
- Loose joints between tread and riser (movement creates a squeal).
- Gaps from seasonal wood shrink and swell.
- Fasteners that missed framing, so the tread flexes under load.
- Friction at edges, where finished wood touches finished wood.
A shim works because it turns a moving gap into a tight, supported joint. Lubricant helps when the issue is mainly surface friction, not structural looseness.
For an additional reference on shim-based stair repairs, this older but still relevant overview is helpful: Silence squeaky stairs with shims, nails.
Before we start: find the squeak and protect the finish
We get better results when we locate the exact spot first. Have one person walk slowly on the stairs while another listens from the side or below (if there’s access). Mark squeaky areas with painter’s tape.
A few safety and prep basics:
- Wear eye protection if we’re working from below.
- Keep the stair surface clean and dry to prevent slips.
- If the stairs are finished hardwood, use painter’s tape to avoid scuffing nearby trim.
Tools and materials we keep on hand
We do not need a shop full of gear. Most squeaky stair fixes come down to a short list.
Basic tools
- Flashlight or headlamp
- Tape measure
- Pencil or painter’s tape
- Hammer
- Drill or driver with bits
- Utility knife (for trimming shims)
Materials
- Wood shims (preferably hardwood)
- Wood glue or construction adhesive (small amount)
- Finish nails or trim-head screws (chosen based on access and visibility)
- Dry lubricant (options below)
- Sandpaper (for tiny touch-ups only)
Dry lubricant options (choose clean, non-oily)
- Powdered graphite
- Talc (unscented)
- Paraffin wax (a plain wax block)
We avoid greasy sprays on finished stairs. They can stain, attract grit, and make steps slippery.
For another practical walk-through of stair squeak causes and solutions, this guide is a solid companion: How to repair squeaky stairs.
Step-by-step: how we fix squeaky hardwood stairs with shims and lubricants
Step 1: Confirm where the movement is
Stand on the squeaky tread and shift weight front-to-back and side-to-side. Listen for where it “cries out”:
- Squeak at the back of the tread often points to the tread-to-riser joint.
- Squeak near the side can mean the tread is moving on the stringer.
- Squeak across the whole step can mean flex from a loose tread.
If we can access the underside, we get a cleaner, longer-lasting repair because fasteners and shims can be hidden.
Step 2: Tighten what’s already loose (without over-driving)
If a tread is moving, fasteners may be loose or missing. From below, we drive trim-head screws through the stringer into the tread (pilot holes help prevent splitting). From above, we only do this when we can hide the heads or plug them cleanly.
A simple rule: pull the wood tight, then stop. Over-driving can crush fibers and invite future squeaks.
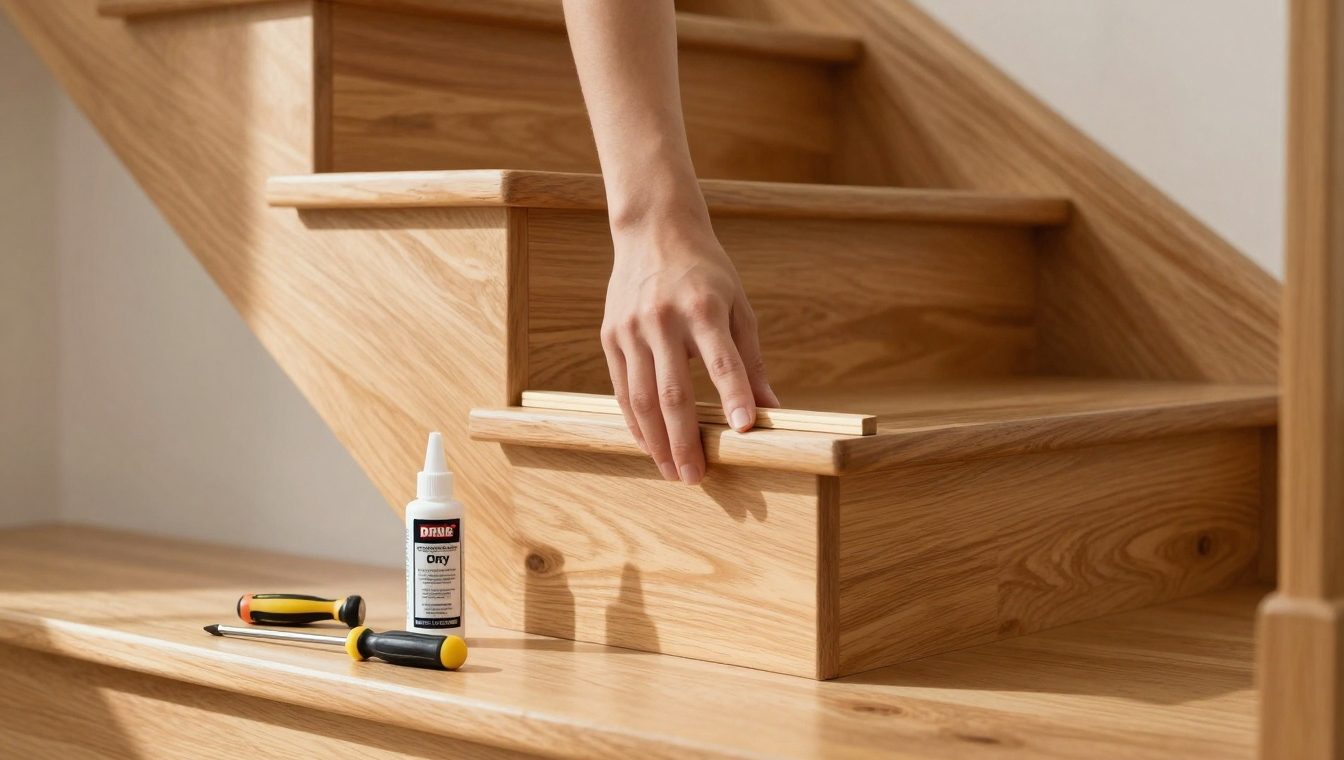
Step 3: Add shims to remove the gap
Shims are best when there’s a visible gap, or when the joint squeaks under pressure.
From below (preferred):
- Apply a small bead of wood glue to a shim.
- Tap the shim gently into the gap where the tread meets the riser or stringer.
- Stop as soon as the joint feels snug. Do not force it.
- Let the glue set, then trim the shim flush with a utility knife.
We use multiple small shims rather than one large wedge when the gap is uneven. This reduces stress and looks cleaner.
From above (when underside access is not possible):
Shims are harder to use from above without cosmetic impact. In that case, we focus more on fastening and dry lubrication (next step). If we must shim, we place it where it will be covered by trim or a runner.
For a quick visual explanation of underside repairs and fastening methods, this video guide is useful: How to stop squeaks in stairs.
Step 4: Use dry lubricant for tread-to-tread or edge friction
If the squeak is a high-pitched chirp and the stair feels solid, it may be finish-on-finish friction.
We apply dry lubricant carefully:
- Clean dust from the joint line.
- Work a small amount of graphite or talc into the seam where the tread meets the riser or skirt board.
- Step on the tread several times to work it in.
- Wipe away residue so it does not dull the finish.
Paraffin wax can also help on tight seams. We rub a wax block along the joint, then buff lightly. The stair should feel safe underfoot when done.
Step 5: Re-test and adjust
We re-test each marked spot before moving to the next. A squeak that changes pitch after shimming usually means we’re close. A squeak that stays the same often means the movement is somewhere else in the step assembly.
Prevention: keep stairs quiet through seasons and daily use
Quiet stairs are part repair and part routine. Wood moves with humidity, and in Georgia that movement is not subtle.
What helps most:
- Control indoor humidity when possible. Many homes do best around a steady mid-range level. The U.S. Department of Energy has practical guidance on home humidity and comfort: https://www.energy.gov/energysaver/humidity-control
- Stop grit at the entry. Dirt acts like sandpaper and speeds wear at stair edges.
- Address small squeaks early. A tiny gap can become a loose joint after months of heavy foot traffic.
- Avoid wet cleaning on stair seams. Water can swell joints, then shrink and leave larger gaps later.
If the stair treads are worn or the finish is thin, squeaks often return because the wood fibers compress more easily under load.
When a squeak is really a bigger stair or flooring problem
Sometimes squeaks are a symptom, not the full issue. If we see cracked treads, bounce, or visible separation at joints, shims and lubricant may not hold for long.
This is also where professional work pays off, especially if we plan to refinish floors or rebuild stairs as part of a larger update. As a flooring contractor in alpharetta ga, we often quiet stairs as part of broader flooring work, because stabilizing the structure before finishing prevents future callbacks. When steps look tired, a hardwood floor sanding contractor in alpharetta can refinish and seal surfaces after the stair assembly is tightened and supported.
Many homeowners also time stair repairs with adjacent projects. If the staircase connects to a renovation zone, coordinating with a kitchen remodeling contractor in alpharetta or a bathroom remodeling contractor alpharetta team can reduce downtime and keep trim, paint, and flooring details consistent.
For a free estimate, call us at 470-352-1156. If you show us any existing quote from another contractor, we beat it by 5%.
We can help to fix your floors in Alpharetta Floors
Squeaky hardwood stairs are usually a friction problem that turns into a noise problem. When we tighten loose parts, add a well-placed shim, and use a clean dry lubricant where it fits, we can fix squeaky stairs in a way that lasts. If the stairs still move or show damage, it may be time for structural repair or refinishing. For clear pricing and fast scheduling, call us at 470-352-1156 for a free estimate, and remember, if you bring an existing quote, we beat it by 5%.